How I've created an intruder detector - Part 3
Introduction
This article is the Part 3 of the series How I've created an intruder detector. For new readers, here’s a link to the Part 1 - Get the picture where we discover how to manually retrieve the image from a D-Link DCS 932L and to the Part 2 - Motion Detection, where we store pictures if motion is detected.
Part 3 - Notification
At this point, I have an application writing files on disk when there is motion detected through the camera. What I can already do is regularly watch the output directory to check whether something new appears but this is not really what we would expect for « an intruder detector » system.
What I really want is to receive notifications on my mobile phone in real-time when the camera sees something and to have access to the actual picture. In order to send push notifications, there are many solutions:
- Create my own Android or iOS application and send real push notifications to the app: doable but longer than other options,
- Pushing the images to a private Instagram or Twitter account and subscribe with my real account to receive notifications or,
- Use applications/services created to do this such as Pushbullet or Pushover.
In favor of validating my proof-of-concept first, I’ll go with the option Pushover. Actually, I’ve first implemented a version using Yo but the API was quite slow and I chose to switch to something else.
The next steps are straight-forward:
- Serve the image on one unique route per picture (hopefully not discoverable from the outside),
- Send a push notification containing a link to the picture.
A hand-drawn schema of what will happen in case of motion detection:
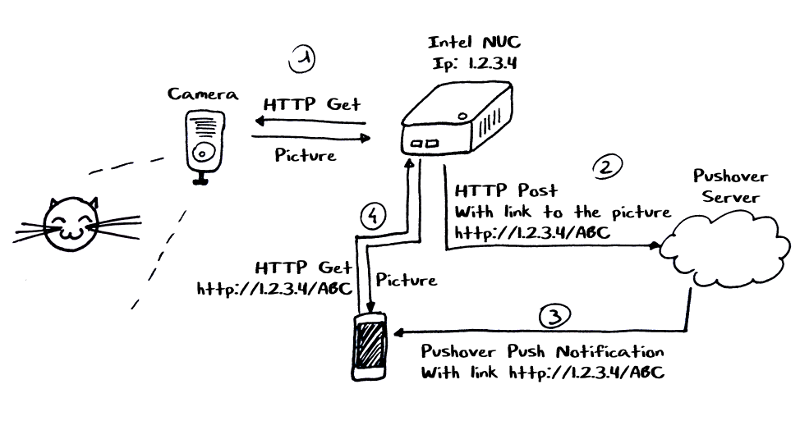
Probably seems a bit complicated but:
- 1 — is already implemented.
- 2 — will be a simple HTTP call using the
net/httpGolang package. - 3 — this is the service offered by Pushover, not much to do here.
- 4 — will also be really simple to implement thanks to Golang.
What is also great in this architecture is that the D-Link DCS 932L camera doesn’t need to be connected to the Internet, it only needs to be connected to my private network.
Serve the image
When motion is suspected, I currently do only one thing: storing the picture on disk. What I want to add is a simple HTTP server providing the picture on a route not discoverable by someone else.
Let’s again start with a naive implementation: we will map a unique ID to the filepath of a stored picture, thus, a controller will be able to serve the content of a picture by its ID only if the given ID exists.
This code can be found in serve.go:
// mapping from a unique ID to the actual filepath on the disk.
var mapping map[string]string = make(map[string]string)

// addPic adds a filename indexed by a generated
// unique ID to the mapping map.
func addPic(filename string) string {
	// generate a random ID
	id := make([]byte, 64)
	for i := range id {
		id[i] = idsChar[rand.Intn(len(idsChar))]
	}

	// we'll now serve this file using this newly generated ID
	sid := string(id)
	mapping[sid] = filename
	return sid
}
In this part of the code we can see the generation of a unique ID for the given picture filename. This ID will later be used to access the picture from the link in the push notification, so, we store it in a map pointing to the actual filepath of the picture. This way, we can resolve this ID to a filepath in this controller serving the picture:
// picHandler resolves the given file ID using the map mapping
// to read the actual image from fs and to serve it.
type picHandler struct{}

func (p picHandler) ServeHTTP(w http.ResponseWriter, r *http.Request) {

	r.ParseForm()
	filename := r.Form.Get("f")
	filepath, exists := mapping[filename]

	// unknown image
	if !exists {
		w.WriteHeader(404)
		return
	}

	// read the file on disk
	data, err := ioutil.ReadFile(filepath)
	if err != nil {
		log.Printf("error: while serving file %s during read: %v", err)
		w.WriteHeader(404)
		return
	}

	// render the file
	w.Header().Set("Content-Type", http.DetectContentType(data))
	w.Write(data)
}
First the controller checks that the ID really exists in RAM in mapping. When it’s the case, the second part of the controller reads this file and writes it in the HTTP response.
I’ve decided to keep this map of IDs in RAM only: it won’t survive a reboot of the server but it won’t be critical at the moment. Now that we can serve the pictures, let’s send a push notification.
Push notification
Pushover is a notification service: it offers applications (iOS, Android, Chrome, …) to receive the notifications and a REST API to send push notifications. Only thing you have to create is a consumer of their API to send custom push notifications. Apps they provide are free for 7 days and then cost $4.99. They offer 7,500 push/month per consumer of the API.
It will be more than enough for my proof-of-concept and after having registered and created a consumer to get an API token, I was ready to use their API.
Changes in code to send the notifications were quite easy: after the storage of the picture on the filesystem, I call the send method in a goroutine. The send method calls the Pushover API through an HTTP POST.
This part of the code can be found in notif.go:
// send uses the Pushover API to send a push notification to my phone
// with a link to serve the image using its unique ID.
func send(t time.Time, id string) {
	if len(id) == 0 {
		return
	}

	values := url.Values{}
	values.Add("token", config.PoToken)
	values.Add("user", config.PoUser)
	values.Add("title", "Motion detection")
	values.Add("message", fmt.Sprintf("Motion detected at %s", t.Format(time.ANSIC)))
	values.Add("url", config.BaseLink+"?f="+id)
	values.Add("url_title", "Open picture")
	values.Add("sound", "gamelan")

	resp, err := http.PostForm(PoApiUrl, values)
	if err != nil {
		log.Printf("error while sending the notification: %v", err)
		return
	}

	if resp.StatusCode != 200 {
		log.Printf("error while sending the notification: %v", resp.Status)
	}
}
I’ve also changed the configuration file to add settings for the Pushover token and user key. A sample of the configuration file is available in the repository.
And I’m done for the notification part.
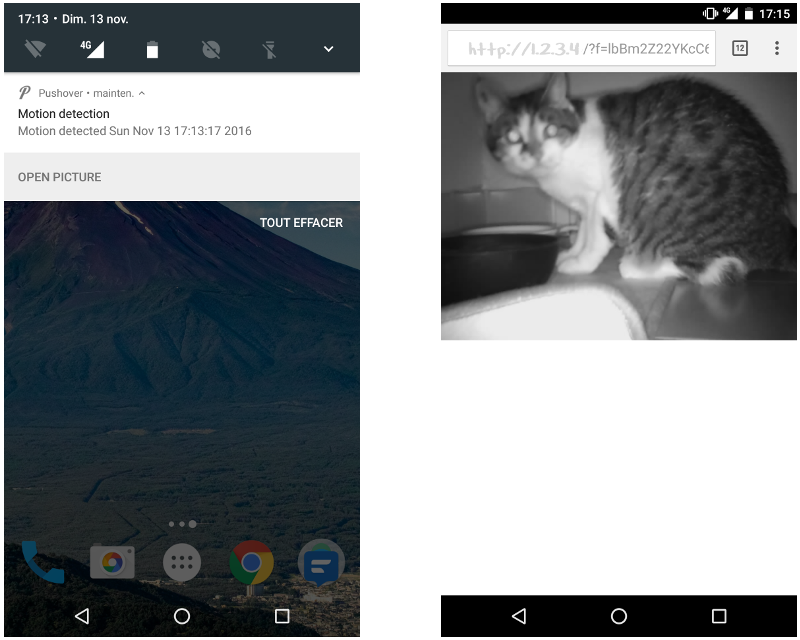
This is the result of the push notification on my mobile and the click on the Open picture button:
Conclusion
I’m quite happy with this naive implementation of my intruder detector, the ratio features/development time is really good due to available resources and services. To go further, a lot of things could be added:
- Limit the motion detection to some hours of the day,
- Delete stored pictures after a few days,
- Replace the IP camera with a webcam to read the picture directly from the webcam,
- Real mobile application having more features (even if we can already provide more features in the served page),
- Improve the detection motion,
- And so on…
I hope you liked this series where I try to share the fun of learning and creating something new. Feedbacks are welcome, either about the articles or the code and feel free to create issues or to send pull-requests on the Github page of the project. Also, I’m available on Twitter so don’t hesitate to contact me!